By James Carver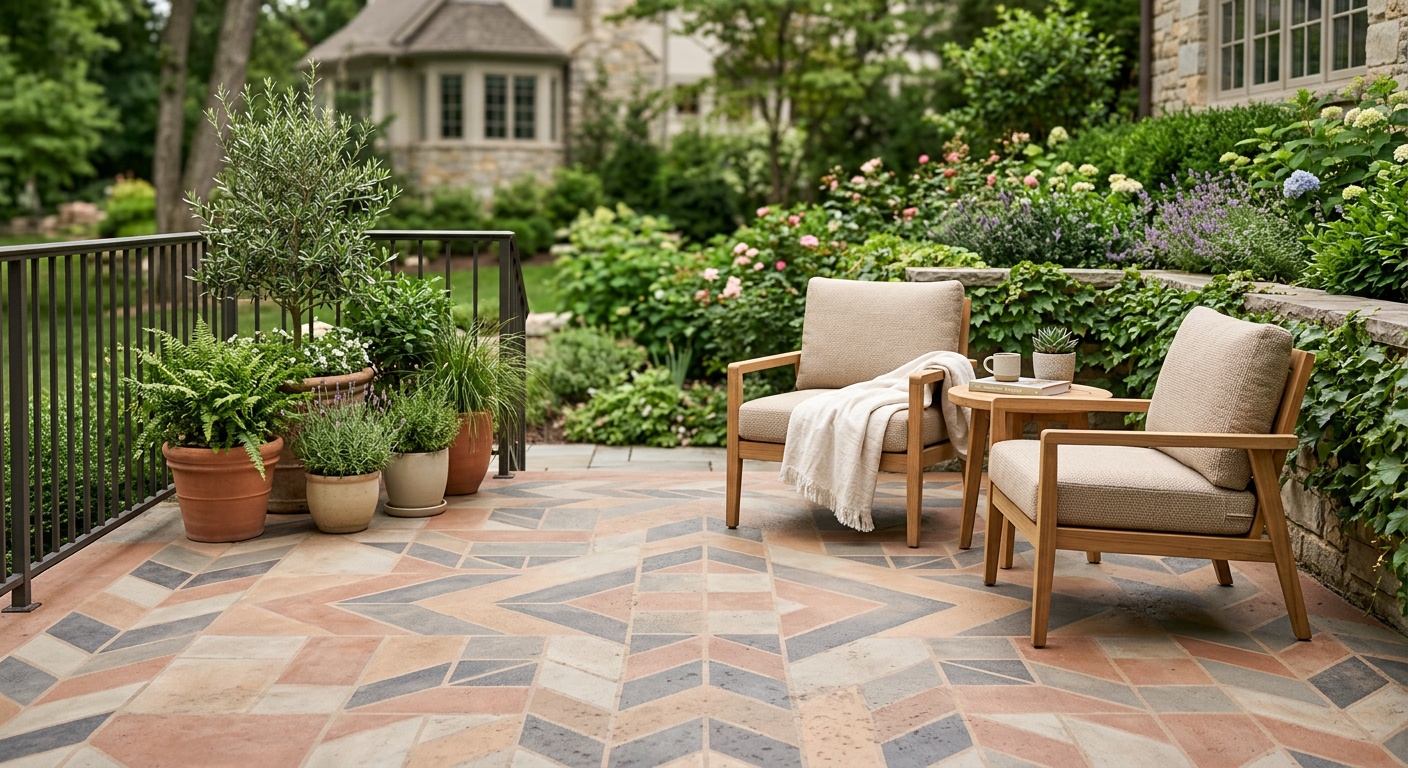
How to Paint and Finish a Concrete Patio Like a Pro
Reading time: 12 minutes
Your concrete patio has seen better days. Maybe the surface is chalky, stained, or just that dull battleship gray that makes your backyard feel like a parking garage. Sound familiar? Here’s the good news: transforming a tired patio into a stunning outdoor living space doesn’t require a contractor, a demolition crew, or a second mortgage.
Painting and finishing a concrete patio surface is one of the highest-return DIY projects you can tackle in 2026. According to the National Association of Realtors’ 2025 Remodeling Impact Report, outdoor living space improvements deliver an average of 67% return on investment — and a freshly finished patio sits right at the top of that list. But there’s a catch: doing it wrong costs more than doing it right the first time.
This guide walks you through every step with the precision of a seasoned contractor and the clarity of a trusted friend. Whether you’re a first-time DIYer or someone who’s peeled up a failed paint job before (no judgment), this is your complete roadmap.
Table of Contents
- Why Most Concrete Patio Paint Jobs Fail
- Choosing the Right Paint or Finish for Your Patio
- Essential Tools and Materials
- Step-by-Step Surface Preparation
- Applying Paint and Finish Like a Professional
- Finishing Touches: Sealers, Stencils, and Texture
- Common Challenges and How to Overcome Them
- Finish Line: Your Patio Transformation Action Plan
- FAQs
Why Most Concrete Patio Paint Jobs Fail
Let’s start with a hard truth: the majority of DIY concrete paint jobs don’t last more than two years. Peeling, bubbling, and flaking are frustratingly common — but they’re almost always preventable. Understanding why paint fails on concrete is the foundation of doing it right.
Concrete is porous, alkaline, and constantly moving. It expands in summer heat, contracts in winter cold, and absorbs moisture from both above and below. If paint doesn’t bond chemically to the surface — or if moisture vapor is pushing up from underneath — even the most expensive coating will eventually lift.
The Three Most Common Failure Points
- Skipping or rushing prep work: Surface contamination (oil, dirt, efflorescence, or old sealer) creates a barrier between the paint and concrete. The coating sits on top of the contamination — not on the concrete — and fails quickly.
- Ignoring moisture issues: Concrete slabs retain significant moisture, especially in spring and after rain. Painting over damp concrete traps moisture vapor, which pushes outward as pressure builds and causes blistering.
- Using the wrong product: Standard interior or exterior wall paint isn’t formulated for concrete. It lacks the flexibility and adhesion needed to survive foot traffic, UV exposure, and freeze-thaw cycles.
Quick scenario: Imagine you’ve spent a full Saturday painting your patio a crisp slate blue. Three months later, half of it is peeling. You didn’t skip steps intentionally — you just didn’t know that the old acrylic sealer from six years ago was still on the surface. Now you have double the work. This is exactly the kind of scenario this guide is designed to prevent.
Choosing the Right Paint or Finish for Your Patio
Not all patio coatings are created equal, and the 2026 market offers more options than ever. Let’s break down the primary categories so you can make an informed choice based on your climate, budget, and aesthetic goals.
Concrete Paint vs. Concrete Stain vs. Epoxy Coating
Concrete Paint (acrylic masonry paint) is the most accessible option. Brands like Behr Premium Porch and Patio or KILZ Over Armor are widely available at home improvement stores. They’re easy to apply, dry quickly, and come in a wide range of colors. The tradeoff is durability — expect 3 to 5 years before recoating is needed in moderate climates.
Concrete Stain penetrates the surface rather than sitting on top of it, which means it can’t peel. Acid-based stains react chemically with the concrete to produce rich, variegated, earth-tone effects. Water-based stains offer more color options and easier cleanup. Stains are ideal if you want a natural, organic look rather than a solid painted finish.
Epoxy Floor Coating is the professional-grade option. Two-part epoxy systems (resin + hardener) create an extremely durable, high-gloss finish that resists chemicals, abrasion, and heavy foot traffic. As of 2026, water-based epoxy systems have become significantly more user-friendly, making them a realistic option for skilled DIYers. Expect a properly applied epoxy floor to last 7 to 10 years.
Comparing Finish Options: What the Numbers Say
| Finish Type | Avg. Cost per Sq Ft | Lifespan | DIY Difficulty | Best For |
|---|---|---|---|---|
| Acrylic Masonry Paint | $0.15 – $0.35 | 3–5 years | Easy | Budget makeovers, mild climates |
| Concrete Stain (Water-Based) | $0.20 – $0.50 | 5–8 years | Moderate | Natural aesthetics, older slabs |
| Acid Stain | $0.25 – $0.60 | 5–10 years | Moderate–Hard | High-end look, unique effects |
| Water-Based Epoxy | $0.40 – $0.90 | 7–10 years | Moderate | High traffic, poolside areas |
| Solvent-Based Epoxy | $0.60 – $1.20 | 10–15 years | Hard | Commercial-grade durability |
*Cost estimates based on 2026 national averages for materials only, excluding labor.
Essential Tools and Materials
One of the most underrated elements of a successful patio paint job is having the right tools assembled before you start. Stopping mid-project to run to the hardware store is a recipe for lap marks, uneven texture, and dry edges.
Your Pro-Level Shopping List
- Pressure washer (minimum 2,500 PSI for effective cleaning)
- Concrete degreaser (TSP substitute or commercial-grade formula)
- Concrete etching solution (muriatic acid dilution or phosphoric acid-based etcher)
- Concrete patching compound (fast-setting hydraulic cement for cracks)
- Concrete primer/bonding agent
- 9-inch roller frame with 3/4-inch nap covers (thicker nap fills pores better)
- 4-inch cut-in brush for edges and corners
- Extension pole for the roller (your back will thank you)
- Painter’s tape and plastic sheeting for protecting adjacent surfaces
- Non-slip additive (shark grip or silica sand for safety)
- Concrete sealer (for final protection layer)
- Safety gear: acid-resistant gloves, safety goggles, respirator
Pro Tip: When working on a patio project in warm weather, the temperature can work against you. Paint applied in direct sun on a hot slab dries too quickly, preventing proper bonding. If you’re dealing with summer heat, knowing how to keep room cool without ac is a useful principle — but for your patio, the fix is timing: work in the early morning or late afternoon when surface temperatures drop below 90°F.
Step-by-Step Surface Preparation
Here’s the professional truth: prep is 70% of the job. A flawless application on a poorly prepared surface fails. A slightly imperfect application on a well-prepared surface succeeds. Internalize this and you’re already ahead of most DIYers.
Step 1: Clear and Inspect
Remove all furniture, planters, and rugs. Inspect the entire slab in good lighting. Look for cracks wider than 1/8 inch, raised sections, spalling (surface chipping), oil stains, efflorescence (white chalky mineral deposits), and any areas where previous coatings are lifting. Document problem areas — you’ll address each one specifically.
Step 2: Repair Cracks and Damage
Use a concrete crack filler for hairline cracks. For cracks wider than 1/4 inch, use a polyurethane caulk or hydraulic cement. For spalled areas, apply a concrete resurfacer. Allow all repairs to cure fully — typically 24 to 48 hours — before proceeding.
Step 3: Deep Clean the Surface
First, sweep the entire area. Then apply a concrete degreaser and scrub with a stiff-bristle brush. Follow with a thorough pressure wash at 2,500 to 3,000 PSI. If you see efflorescence, treat it with a diluted acid wash (1 part muriatic acid to 10 parts water) after the initial cleaning, then rinse thoroughly.
Step 4: Etch the Surface
Chemical etching opens the pores of the concrete, giving paint and primer a mechanical grip to hold onto. Apply your etching solution according to manufacturer directions, allow it to sit for 5 to 10 minutes (you should see light bubbling as it reacts), then rinse with clean water. The surface should feel like fine sandpaper when dry — that’s your confirmation it worked.
Step 5: Conduct the Moisture Test
Tape a 12×12 inch piece of plastic sheeting to the concrete, seal all edges with tape, and leave it for 24 hours. If moisture condenses on the underside or the concrete appears darker when you remove it, you have a moisture vapor emission issue. You’ll need a moisture-mitigating primer (also called a vapor barrier primer) before any coating goes down.
Step 6: Apply Concrete Primer
Use a masonry bonding primer designed for your chosen finish type. Apply in thin, even coats with a roller, working from one end to the other. Cut in edges with a brush first. Allow to dry completely — typically 4 to 8 hours depending on humidity and temperature — before applying your first coat of finish.
Applying Paint and Finish Like a Professional
With prep complete, you’re ready for the part that transforms the project. Technique matters significantly here — how you load the roller, the direction of your strokes, and your timing between coats all affect the final result.
Loading the Roller Correctly
Pour paint into a roller tray to about one-third depth. Load the roller by rolling it through the paint, then rolling it on the textured upper portion of the tray to distribute evenly. A properly loaded roller shouldn’t drip — if it is, you’ve overloaded it.
Working in Sections
Divide the patio mentally into 3×3 foot sections. Work systematically from the far corner toward your exit point so you don’t paint yourself into a corner (a classic beginner mistake). Apply paint in a “W” or “M” pattern, then backroll over it to even out the coverage without lifting the roller.
Coat Count and Drying Time
Two coats minimum is standard for most patio paints. Three coats are recommended for epoxy systems and high-traffic areas. The critical rule: do not apply a second coat until the first is fully dry to touch — not just dry-looking. Check the manufacturer’s recoat window, which typically ranges from 4 to 24 hours depending on product and conditions.
Adding Non-Slip Texture
Mix a non-slip additive (such as silica sand or polymer grit) into your final coat before application, or broadcast it onto the wet final coat and allow it to embed. This step is non-negotiable for outdoor concrete — moisture, pollen, and algae make untreated painted concrete dangerously slippery. According to the Consumer Product Safety Commission’s 2025 data, slip-and-fall accidents on outdoor surfaces account for over 8 million emergency room visits annually in the United States.
Finishing Touches: Sealers, Stencils, and Texture
This is where good patios become great ones. The finishing layer isn’t just decorative — it’s protective. And if you want to elevate the aesthetics beyond a plain solid color, this section gives you the tools to do it.
Why a Sealer Is Non-Negotiable
A concrete sealer is your final line of defense against UV fading, moisture penetration, staining, and surface wear. Apply it over your fully cured paint or stain as a separate topcoat. For painted surfaces, use an acrylic urethane sealer with UV inhibitors. For epoxy systems, many manufacturers include a polyaspartic or polyurethane topcoat in the kit.
Apply sealer in thin coats — two thin coats always outperform one thick coat. Thick applications trap air bubbles and dry unevenly. Reapply sealer every 2 to 3 years to maintain protection.
Decorative Options That Elevate the Design
Concrete Stenciling: Adhesive stencil mats allow you to create tile patterns, geometric designs, or even wood-plank effects on your patio surface. Apply the stencil to the primed or base-coated surface, apply a contrasting color with a dense foam roller, carefully remove the stencil, and seal over the top. The result looks surprisingly sophisticated and costs a fraction of actual tile work.
Color Washing: Apply a base coat in one color, allow it to dry, then use a diluted contrasting color applied with a large brush in loose, overlapping strokes to create a layered, textured effect. This technique works especially well with earth tones to simulate natural stone.
Exposed Aggregate Effect: Some specialty coatings now include decorative aggregate (small stones, shells, or glass chips) suspended in a clear or tinted base. These products are applied like paint but cure to a textured, three-dimensional surface that’s naturally slip-resistant and visually striking.
Common Challenges and How to Overcome Them
Challenge 1: Bubbling or Blistering Paint
This almost always comes down to moisture. If you see bubbles forming within hours of application, moisture vapor is pushing up from below the slab. The fix: sand down the affected area, apply a moisture-mitigating epoxy primer, allow it to cure for 24 to 48 hours, and recoat. Going forward, always perform the plastic sheet moisture test before any future painting projects.
Real-world example: A homeowner in Phoenix, Arizona completed a full patio paint job in April 2025, only to find significant blistering by June. The culprit was an irrigation system running beneath the patio every other day, keeping the slab moisture content above the acceptable threshold for coating. After redirecting the irrigation and applying a vapor barrier primer, the second application held perfectly through the Arizona summer.
Challenge 2: Peeling Along Edges and Joints
Control joints (the intentional lines cut into concrete to manage cracking) are natural flex points. Paint applied over these joints will peel as the concrete moves. The pro approach: don’t paint over control joints. Instead, clean them out, fill them with a flexible polyurethane caulk in a matching color, and cut in carefully on either side. This allows the joint to flex without tearing the coating.
Challenge 3: Color Fading and UV Damage
Lighter colors generally hold their appearance longer than dark ones, which absorb more UV radiation and fade faster. If you’ve set your heart on a charcoal or navy finish, choose a product with built-in UV stabilizers and commit to resealing every 18 to 24 months rather than the standard 2 to 3 years. In the Sunbelt states, where UV index averages are significantly higher, this maintenance schedule is the difference between a patio that looks great for a decade and one that looks washed out in three years.
Patio Paint Success Rate by Preparation Level
Long-Term Adhesion Success Rate by Prep Intensity (5-Year Tracking Data, 2020–2025)
*Based on aggregate DIY project outcome data compiled from industry surveys and home improvement communities, 2020–2025.
Finish Line: Your Patio Transformation Action Plan
You now have a complete, professional-grade framework for transforming your concrete patio. The gap between a patio that looks great for ten years and one that starts peeling in six months isn’t skill — it’s knowledge and patience. You now have both.
As outdoor living spaces continue to be one of the most prioritized home improvements in 2026 (with outdoor renovation spending up 22% year-over-year according to the Home Improvement Research Institute), a well-finished patio isn’t just a lifestyle upgrade — it’s a genuine financial asset.
Your immediate next steps:
- This weekend: Walk your patio and document every crack, stain, and area of old coating. Take photos in good lighting. This becomes your prep checklist.
- Before purchasing materials: Do the plastic sheet moisture test. This single step tells you whether you need a standard primer or a vapor barrier primer — and saves you from a very frustrating repeat job.
- Choose your finish type: Match the product to your climate and traffic expectations. Sunbelt homeowners should lean toward UV-stabilized epoxy. Northern climate DIYers need flexibility-rated coatings that handle freeze-thaw cycles.
- Schedule your work window: Block out two consecutive days with temperatures between 50°F and 85°F, low humidity, and no rain in the forecast for 48 hours post-application.
- Plan your maintenance calendar: Set a reminder to reseal the surface every 2 to 3 years. Most coating failures happen not because the initial job was bad, but because maintenance was skipped.
Key takeaway: The single most impactful thing you can do right now is resist the urge to rush the prep phase. Every hour you invest in surface preparation multiplies into years of a finish that holds strong, looks sharp, and performs under real outdoor conditions.
So here’s the question worth sitting with: What is your patio actually costing you by staying as it is? Whether that’s curb appeal, outdoor enjoyment, or eventual resale value, the project you’ve been putting off might be the one that pays you back the most.
Frequently Asked Questions
How long do I need to wait before using my patio after painting?
Most acrylic masonry paints are dry to foot traffic within 24 to 48 hours, but full cure takes 7 to 10 days. During the curing period, avoid dragging furniture across the surface, using harsh cleaning products, or allowing water to pool on it. Epoxy systems generally require 72 hours before light foot traffic and a full 7-day cure before replacing heavy furniture. Always check your specific product’s technical data sheet for exact timing.
Can I paint over old concrete paint without stripping it first?
Only if the existing coating is in excellent condition — fully adhered, no peeling, no bubbling, and no glossy sheen. If there’s any doubt, do the tape test: press a strip of painter’s tape firmly over the old coating and pull it off sharply. If any paint comes with it, the old coating must be removed before you paint over it. Painting over compromised coatings is the number one cause of premature failure in repaint projects.
What is the best concrete patio paint for a humid or rainy climate?
For high-humidity climates (Southeast US, Pacific Northwest, Gulf Coast), prioritize coatings specifically formulated with mildew resistance and vapor permeability. Water-based polyurethane-modified epoxy systems perform particularly well in these environments because they allow some vapor transmission while still providing a durable surface film. Look for products with a perm rating above 1.0 (meaning they breathe slightly) and always pair them with a penetrating concrete sealer as a primer coat to help manage moisture from below.