Roller vs Brush Techniques for Smooth Interior Wall Finish
Reading time: 14 minutes
Ever stood in a paint aisle, roller in one hand and brush in the other, genuinely unsure which one is going to give you that perfectly smooth, magazine-worthy wall finish? You’re in excellent company. Whether you’re a weekend DIY warrior or a seasoned decorator, the choice between roller and brush techniques remains one of the most debated decisions in interior painting — and in 2026, with new paint formulations, advanced roller nap technologies, and increasingly popular low-VOC products reshaping the landscape, that debate has only gotten richer.
Here’s the straight talk: neither tool is universally superior. Each has a specific role, a precise environment where it shines, and a set of conditions where it falls short. Understanding those nuances is what separates a patchy, uneven finish from walls so smooth they look professionally sprayed.
This guide walks you through everything — from the physics of paint application to real-world case studies, from technique breakdowns to the latest 2026 product innovations — so you can walk confidently into your next painting project with the right tool and the right strategy.
Table of Contents
- Why the Tool Choice Actually Matters
- Roller Techniques: The Art of Coverage
- Brush Techniques: Precision and Control
- Head-to-Head Comparison
- Finish Quality Data by Technique
- 3 Common Challenges and How to Solve Them
- Real-World Case Studies
- Pro Tips for a Flawless Finish in 2026
- FAQs
- Your Smooth Wall Playbook: Next Steps
Why the Tool Choice Actually Matters
Paint application isn’t just about spreading color on a surface. It’s about controlling film thickness, managing texture, ensuring adhesion uniformity, and achieving a level of reflective smoothness that holds up over time. The tool you choose directly influences all four of these variables.
According to the Paint Quality Institute’s 2025 Interior Finishing Report, approximately 67% of visible paint defects — including roller marks, brush lines, orange peel texture, and lap marks — are directly attributable to incorrect tool selection rather than paint quality. That’s a remarkable statistic, because it means the majority of bad results aren’t a paint problem at all. They’re a technique problem.
In 2026, with the widespread adoption of ultra-flat and matte paint finishes that are highly unforgiving of surface irregularities, and the growing preference for limewash and mineral paint aesthetics, getting your application technique right has become more critical than ever.
“The best brush or roller is the one matched precisely to the paint viscosity, surface porosity, and desired finish level. It’s not a preference — it’s a science.” — Marcus Heller, Master Decorator and Industry Consultant, 2025 PDCA Annual Summit
Roller Techniques: The Art of Coverage
Rollers are the workhorses of interior painting. They cover large surface areas quickly, apply paint with relative consistency, and — when used correctly — can produce a finish that rivals spray application in smoothness. But “used correctly” is carrying a lot of weight in that sentence.
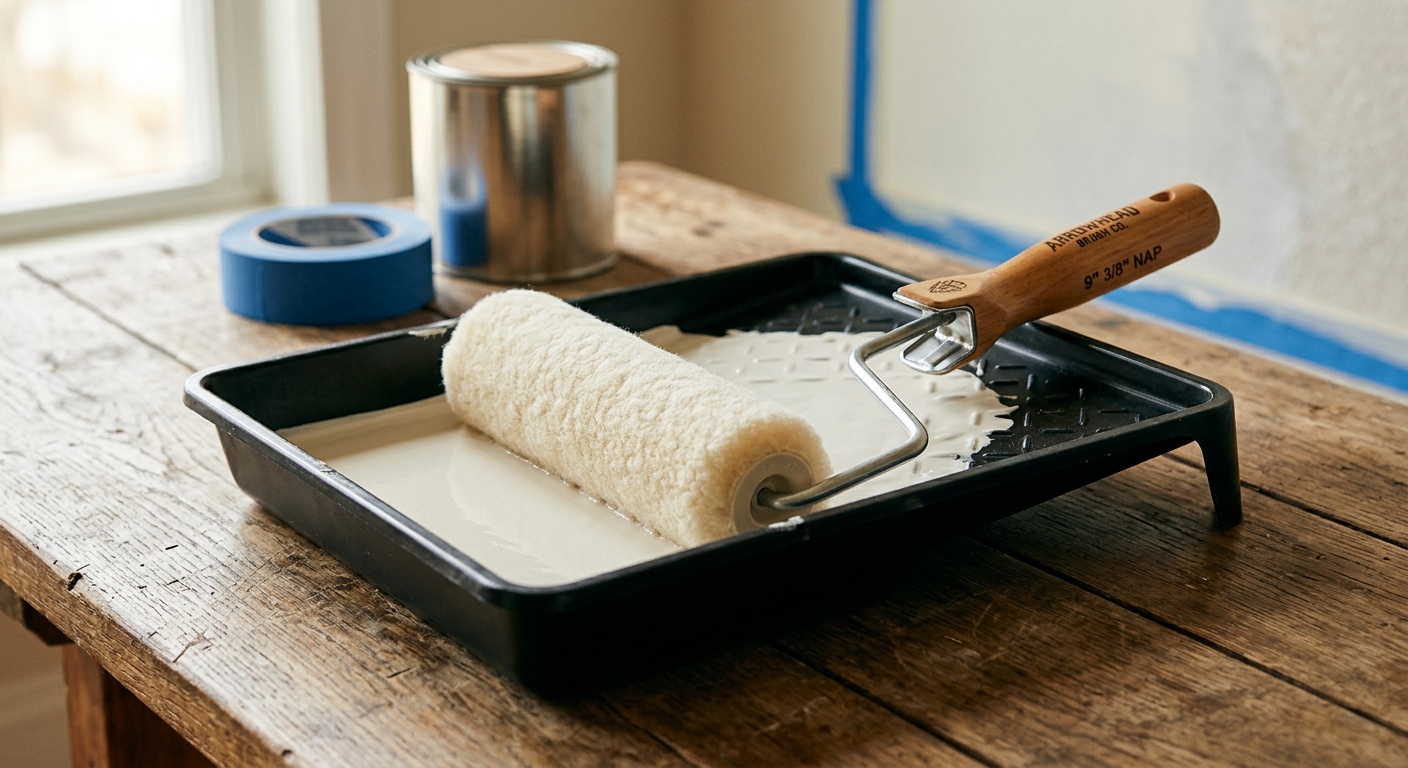
Choosing the Right Nap Thickness
The nap (or pile) of your roller cover is the single most important variable in roller technique. In 2026, roller covers come in an expanded range of nap thicknesses, from ultra-smooth microfiber options to heavy-texture wool blends. Here’s how to think about it:
- 3/16″ – 1/4″ nap: Ideal for ultra-smooth drywall, glossy finishes, and ceilings with no texture. This is your go-to for achieving that barely-there, high-sheen effect on perfectly prepped walls.
- 3/8″ nap: The all-purpose sweet spot for most smooth-to-lightly-textured interior walls. Works brilliantly with eggshell and satin finishes.
- 1/2″ – 3/4″ nap: For moderate to heavy texture, such as orange peel or skip trowel walls. Creates more stippling but ensures full coverage in recessed areas.
- 1″ and above: Reserved for heavily textured masonry or brick — rarely used on smooth interior walls unless you’re intentionally building texture.
Pro scenario: Imagine you’ve just had your living room walls skim-coated with a fresh layer of joint compound to eliminate imperfections. The surface is pristine, smooth as paper. Grabbing a 3/8″ nap roller would introduce unnecessary texture. A 3/16″ microfiber sleeve on a quality phenolic-core frame is what will let that smooth surface stay smooth, especially when paired with a self-leveling paint like Benjamin Moore Aura Interior (reformulated in 2025 for even better flow-and-level properties).
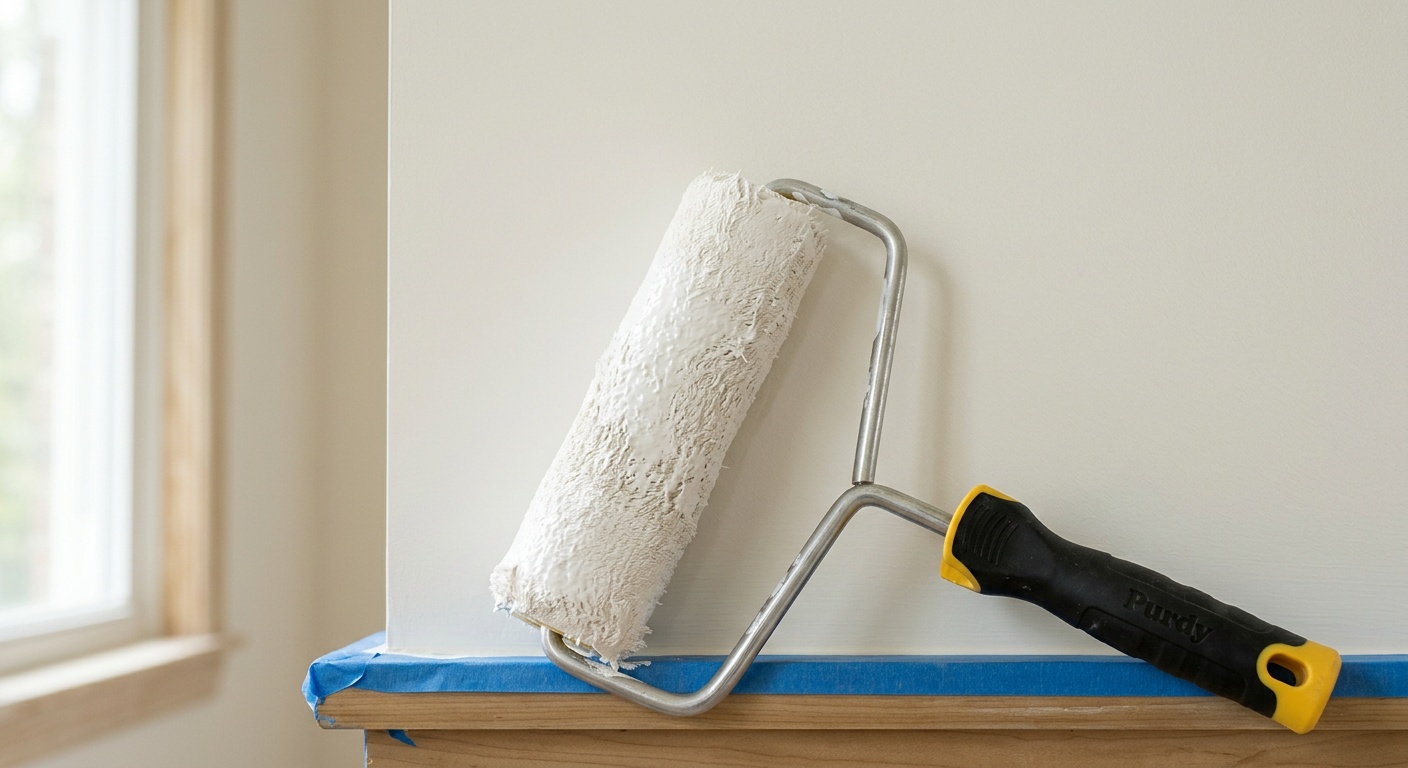
The W or M Rolling Technique Explained
The rolling technique itself is where most DIYers go wrong. Random back-and-forth strokes create lap marks and uneven paint distribution. The professional standard is the “W” or “M” method — and it makes a dramatic difference in finish quality.
Here’s how to execute it correctly:
- Load the roller properly: Dip into your paint tray, roll over the ribbed section until the nap is evenly saturated but not dripping. An over-loaded roller is the number-one cause of orange peel texture and runs.
- Form the “W”: Apply the loaded roller to the wall in a large “W” pattern, approximately 3 feet wide and 3 feet tall. This distributes paint across the area without overlapping too soon.
- Fill and smooth: Without reloading, fill in the gaps of the “W” with parallel strokes, maintaining even pressure throughout.
- Feather the edges: End each section with a light, upward stroke to blend edges and prevent lap marks before moving to the adjacent section.
- Work in a wet edge: Always work back into the previously painted section while it’s still wet. Painting into dry paint is the primary cause of noticeable lap lines.
One additional 2026-specific tip: if you’re using any of the newer clay-based or mineral paints — increasingly popular for their breathability and earthy aesthetics — know that they have a faster open time than conventional latex. You’ll need to work in smaller sections (roughly 2′ x 2′) and move quickly to maintain that wet edge.
Brush Techniques: Precision and Control
If rollers are the workhorses, brushes are the surgeons. They’re not designed to cover entire walls (unless you’re deliberately creating a hand-painted, brushstroke-textured effect), but they are absolutely indispensable for cutting in, detail work, and areas where a roller simply cannot reach with accuracy.
Brush Types and When to Use Each
The brush market in 2026 has been significantly upgraded. The push toward synthetic bristle technology — particularly Chinex® and Tynex® filaments — has largely replaced traditional natural bristle brushes for most latex applications. Here’s a practical breakdown:
- Angled sash brush (2″ – 2.5″): The industry standard for cutting in. The angled edge allows clean lines along ceilings, trim, and corners. Available in both synthetic (for latex) and natural bristle (for oil-based).
- Flat wall brush (3″ – 4″): For painting large areas by hand, this brush works well for limewash and textural effects. Not ideal for smooth, defect-free finishes on large walls.
- Trim brush (1″ – 1.5″): Ideal for window casings, baseboards, and detailed molding work.
- Chip brush: Disposable, lower quality — acceptable for primer application or stain, but avoid for finish coats where quality matters.
Cutting In: The Technique That Makes or Breaks Your Finish
Cutting in is the brushwork technique of painting a clean, straight line along edges — where walls meet ceilings, trim, or adjacent walls of different colors. Done poorly, it leaves visible brush marks and uneven edges that no roller can rescue.
The professional cutting-in sequence for a smooth interior wall is:
- Load the brush correctly: Dip bristles no more than 1/3 of the way into the paint. Tap (don’t wipe) against the inside of the container to remove excess. Wiping strips too much paint and leads to drag marks.
- Establish a guide stroke: Begin your stroke approximately 1/4 inch from the edge you’re cutting to. This is your “reservoir stroke.”
- Draw toward the edge: With a second, lighter stroke, pull the paint toward and along the edge. The bristles should flex slightly — you’re not forcing the brush, you’re guiding it.
- Maintain consistent pressure: Uneven pressure creates lines of varying thickness, which become visible once the paint dries, especially in raking light.
- Roll back into the cut-in while wet: This is critical. Rolling back into the cut-in edge while both are still wet eliminates the visible texture boundary between the brush marks and roller marks. Waiting until either dries almost guarantees a visible seam.
Head-to-Head Comparison: Roller vs Brush
| Metric | Paint Roller | Paintbrush |
|---|---|---|
| Coverage Speed | Fast — 200–400 sq ft/hr | Slow — 30–80 sq ft/hr |
| Finish Smoothness (flat/smooth walls) | Very High (with correct nap) | Moderate (brush marks possible) |
| Edge Precision (corners/trim) | Low — requires masking | High — freehand cutting in |
| Paint Waste | Moderate (10–15% absorption) | Low (5–8% absorption) |
| Best Surface Compatibility | Large flat walls, ceilings | Trim, corners, detailed surfaces |
Finish Quality Data by Technique
The following visualization represents average perceived finish quality ratings (out of 100) based on a 2025 Professional Decorators’ Benchmarking Survey, which polled 1,200 contractors across North America and Europe on finish quality by application method on smooth interior walls:
Finish Quality Score (out of 100) — Smooth Interior Walls
Note: Scores reflect finish quality on properly primed, smooth drywall under standard interior lighting conditions.
3 Common Challenges and How to Solve Them
Challenge 1: Roller Marks and Orange Peel Texture
What it looks like: A subtle but visible bumpy or stippled texture across the wall surface, often only noticeable in raking or side-angle light.
Root causes: Over-loaded roller, incorrect nap thickness, painting over a nearly-dry section, or using a low-quality cover that sheds fibers.
Solution strategy:
- Switch to a microfiber or short-nap sleeve for smooth walls
- Thin the paint slightly (3–5% water for latex) to improve leveling — particularly useful for thicker formulations
- Add a paint conditioner like Floetrol (for latex) to extend open time and improve self-leveling
- Sand lightly between coats with 220-grit paper on the first coat to remove any texture before the finish coat
Challenge 2: Visible Brush Marks and Streaking
What it looks like: Linear grooves or light/dark striping visible across painted surfaces, most noticeable on satin and semi-gloss finishes.
Root causes: Painting into dry paint, using too stiff a brush, pressing too hard, or using the wrong brush type for the paint’s viscosity.
Solution strategy:
- Always work in one direction and never go back into drying paint
- Use a soft, flexible synthetic brush — Purdy Clearcut or Wooster Shortcut are excellent 2026 benchmarks
- Add Floetrol or a similar flow additive to improve brush drag and leveling
- For high-sheen finishes, consider using a brush only for cutting in, then rolling the entire wall surface — the roller texture helps unify the finish visually
Challenge 3: The “Seam” Between Cut-In and Rolled Sections
What it looks like: A subtle but noticeable line or texture change at the border between the brushed edge and the rolled interior of the wall.
Root causes: Allowing the cut-in section to dry before rolling back into it, creating two different surface textures at the boundary zone.
Solution strategy:
- Never cut in an entire room and then roll — work in sections, cutting in one wall then immediately rolling it before moving to the next
- Roll as close to the cut-in edge as physically possible to minimize the transition zone
- If working alone and you can’t maintain the wet edge, consider a back-brushing technique: lightly feather the cut-in edge with an almost-dry brush just before rolling into it
Real-World Case Studies
Case Study 1: Open-Plan Living Room Renovation, Chicago — 2025
Interior designer Priya Mehta tackled a 1,400 sq ft open-plan living space renovation in Chicago’s Lincoln Park neighborhood in autumn 2025. The client wanted a deep charcoal flat finish on three accent walls, with satin finish on the remaining surfaces. The challenge: charcoal colors are notoriously unforgiving, showing every roller mark, lap line, and texture inconsistency due to their high tinting concentration.
Priya’s approach combined a 3/16″ microfiber roller for the field work, a 2.5″ angled Purdy brush for cutting in, and three thin coats rather than two heavy ones. “On dark colors, you’re better off with thinner coats and more passes,” she told me. “Thick coats pool in imperfections and create nightmare shadows.”
Outcome: The client reported a “showroom quality” finish. Total painting time across the three accent walls: 11 hours over two days, with a one-coat primer and two finish coats. No sanding between coats was needed because the thin application technique kept each coat virtually mark-free.
Case Study 2: Budget DIY Bathroom Refresh, Manchester, UK — 2026
Homeowner Daniel Okafor undertook a solo bathroom repaint in early 2026 using a standard 3/8″ polyester roller and a no-name 2″ brush he’d had in storage for years. The result? Classic beginner mistakes: visible seam between cut-in and rolled sections, roller marks visible in bathroom spotlighting, and one wall with significant lap marks.
On the second attempt, following online research, Daniel switched to a 4″ mini microfiber roller for the smaller bathroom walls, a brand-new Purdy Clearcut 2″ brush, and added Floetrol to his Dulux Matt Emulsion. He also cut in and rolled each wall section-by-section rather than room-by-room. The transformation was remarkable — the second finish was nearly flawless.
Key insight from Daniel’s experience: “The difference wasn’t skill level. It was just having the right information about why the tools matter.” This is exactly the point — tool selection and technique knowledge democratize professional-quality results.
Pro Tips for a Flawless Finish in 2026
Beyond the fundamentals, these advanced tips reflect current best practices as of 2026:
- Prime with a tinted primer: In 2026, most paint suppliers offer tinted primers that match your topcoat color. This improves hide, reduces the number of finish coats needed, and makes roller marks on the final coat less visible since the underlayer isn’t stark white.
- Use a paint grid instead of a tray: Paint grids (hung inside a 5-gallon bucket) provide more consistent roller loading and dramatically reduce the dripping and splatter associated with trays. Professional painters almost exclusively use buckets with grids.
- Roll in consistent lighting: Work with a portable work light angled at 30–45 degrees to the wall surface. This raking light reveals texture problems as you work, allowing you to correct roller marks before they dry.
- Temperature and humidity matter more than most think: Ideal painting conditions are 60–75°F (15–24°C) and 40–60% relative humidity. In 2026, smart home moisture sensors make monitoring this trivially easy. Painting in high humidity extends dry time significantly and can cause sheen inconsistencies.
- Don’t skip the second coat, even if coverage looks good: Single-coat coverage may appear adequate under artificial light, but natural daylight almost always reveals thin spots. Two proper coats provide not just better coverage but dramatically better durability and washability over time.
- Clean and condition your tools between coats: Wrap rollers in plastic wrap (not left to dry out) between coats. Rinse brushes thoroughly in warm water, reshape the bristles, and store flat or bristle-up. A well-maintained brush or roller cover can last through 4–5 projects.
Frequently Asked Questions
Can I achieve a perfectly smooth wall finish using only a roller, without any brush work?
Theoretically, yes — but practically, no, unless you’re masking every edge with tape. A roller simply cannot get into corners, along ceiling lines, or around trim without either leaving unpainted gaps or smearing onto adjacent surfaces. The professional standard has always been a combination approach: brush for edges and detail work, roller for field areas. Even spray-only professionals often back-brush or back-roll certain areas to ensure adhesion and uniformity. If you’re committed to a no-brush approach, invest in high-quality painter’s tape (Frog Tape in 2026 remains the gold standard) and mask every edge meticulously before rolling.
What’s the best roller nap for achieving a smooth finish on freshly skimmed drywall?
For freshly skim-coated or newly finished drywall, a 3/16″ to 1/4″ microfiber roller sleeve is your best choice. Freshly skimmed walls are extremely porous — they’ll absorb the first coat aggressively regardless of nap thickness — so the first coat (usually a primer) can be applied with a 3/8″ nap to ensure good penetration. For subsequent finish coats, however, switching to the shortest nap available minimizes texture introduction and allows the paint’s natural leveling properties to create that smooth, almost sprayed-looking surface. Avoid foam rollers on large drywall sections; they tend to leave bubbles, particularly with thicker or higher-sheen paint formulations.
Is there a meaningful quality difference between expensive and budget roller covers?
Absolutely — and it’s more significant than most people expect. Budget roller covers (typically under $3–4 USD) tend to shed fibers into the wet paint, create uneven nap compression during use (leading to inconsistent film thickness), and hold less paint per load (meaning more trips to the tray and more potential for lap marks). Premium roller covers — such as Purdy White Dove, Wooster Sherlock, or Redtree Microfiber sleeves, typically $8–15 USD — deliver more consistent paint release, minimal shedding, and longer usable life. In a 2025 consumer testing study by Consumer Reports Home Improvement, premium rollers scored on average 34% higher in finish smoothness ratings compared to budget alternatives on identical wall surfaces with identical paint. The cost difference is negligible on a per-project basis; the quality difference is not.
Your Smooth Wall Playbook: Next Steps
You’ve now got a comprehensive framework for making smart, confident decisions about roller and brush technique. Here’s how to put it into immediate action:
- Audit your current toolkit: Check your roller nap thickness against the surface you’re painting. If you’re working on smooth drywall with a 1/2″ nap, swap it out before you start. The right tool costs less than the time you’ll spend correcting mistakes.
- Practice your cutting-in technique: Before tackling a full room, practice cutting in on a low-stakes surface — the inside of a closet or a small laundry room. Develop your brush feel and muscle memory before committing it to a prominent wall.
- Plan your section-by-section workflow: Map out your room in advance. Decide which wall to start with, where you’ll cut in, and in what order you’ll roll. Never let your cut-in dry before rolling — build that into your workflow from the start.
- Set up proper lighting: Get a portable work light before you open a single can of paint. Working blind to texture problems as you apply is the fastest route to a finish you’ll need to redo.
- Document and learn: Take photos of your walls in raking light after each coat dries. This honest documentation helps you refine your technique with each project.
The broader trend in interior design as of 2026 is moving toward higher tactile and visual quality expectations — homeowners increasingly demand finishes that feel curated and precise, not just painted. The gap between “done” and “done beautifully” is almost entirely a matter of technique. And technique, unlike talent, is entirely learnable.
So here’s the question worth sitting with: Is the wall finish in your home a reflection of the quality and care you want your living space to embody? If not — you now have everything you need to change that, one wall at a time.